FAQ
1. Installation and running the program
Q. How do I install the program?
A. Please see Installation instructions above.
2. Before you begin using the pre-trained system
Q. What kind of behaviors can the system recognize?
A. The system has been trained to recognize 8 stereotypical mouse behaviors: eat, drink, groom, hang, micromovement, rear, rest, and walk.
Q. What format of video is required?
A. You must have the correct codec installed on the machine (this codec will allow our system to play and process your video). You must be able to play the video using our GUI. If you can play the video and do background subtraction successfully (the second and third steps in the testing and training process) then you are all set. If you cannot do this, use a video processing program (such as avidemux) to convert your video to a format that works.
Q. What resolution of video is required?
A.The system was trained on 320x240 videos. You should use similar video resolution in order to obtain good results.
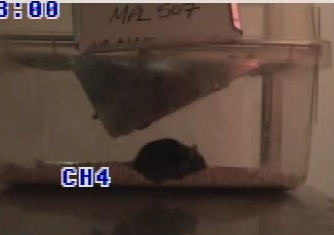
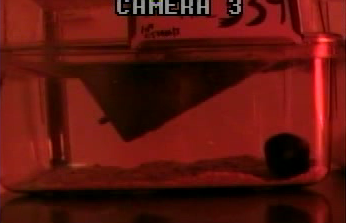
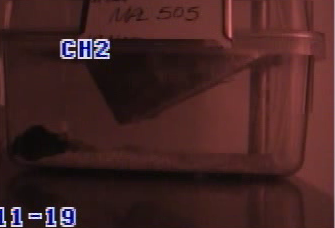
Q. Does the pre-trained system only work for homecage?
There are 4 pertained models. With the default model that uses the motion as well as all the 14 position features, we have had success with homecage as well as disposable cage under a range of lighting conditions, as shown below.
Home cage during the day:

Home cage at night using red light source:
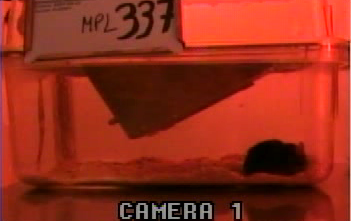
Disposable cage during the day:

Disposable cage during the night using IR light source:
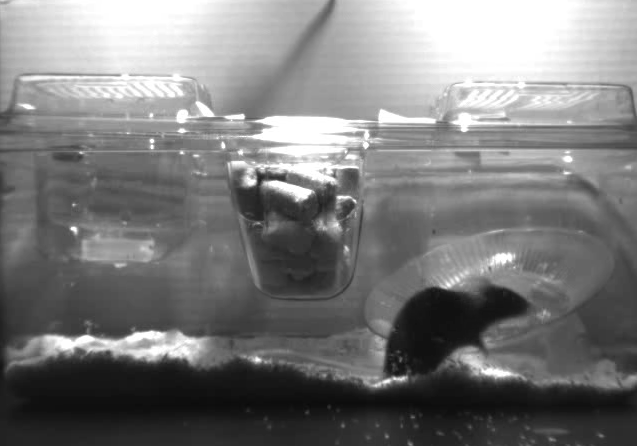
Homecage and disposable cages both have the drinking tube and the feeder on top of the cage. With the cage without feeder such as a JAG75 Cage shown below, certain position features have to be disabled to obtain the best results and the system has to be retrained.
Q. How do I optimize the video recording quality?
A. For best video quality, there should be an abundance of diffused light. In the day, overhead light source is good. In the night, we had used dim red light bulbs (for example Philips 25 watt "party and deco") connected to a standard lamp. Place the lamp behind the camera and have it face the cage so that the lights bounce off the wall behind the mouse cage. Make sure there is no glare on the surface of the cage. The wall behind the cage is preferably a white wall to create the large contrast between the mice (black) and the background. We have also used Infrared (IR) light source in the night and obtained satisfactory the results.
Q. What kind of camera is recommended?
A. For the published results, we used a JVC digital video camera (GR-D93) with frame rate 30 fps connected to a PC workstation by means of a Hauppauge WinTV video card. The resulting video format is MPEG-2. We have switched to the Point Grey FireflyMV firewire cameras, which is connected to a workstation and records compressed video on the fly. Using color camera, a red light source is required for the recording at night. Using IR camera, a IR light source is required at night. In addition, we recommend installing XVID, a free program for compressing to the MPEG-4 ASP format with video container (.avi). Empirically, a 24 hr of mpeg4-compressed 640x480 color video has size around 2GB. In contrast, an uncompressed video would be hundreds of GB for that same duration and size. In addition to our lab, other labs at MIT in both robotics and neuroscience also use Point Grey cameras. Note that the Point Grey Research does not provide Macintosh support or Macintosh-compatible software.
2. Before training your own system
Q. When do I need to train my own system?
A. The default model provided along with the source code package is trained on a homecage with 8 types of annotated behaviors (drink, eat, groom, hang, move, rear, rest, walk) under day and night sessions. If your cage doesn't have the feeder and the drinking tube on top of the cage (see the question "Does the pretrained system only work for homecage?" for details) or if you care about behaviors other than the 8 types, then you need to collect videos, annotate them frame-by-frame, and use this data to train a new system. We had success with training a new system with the "running on the wheel" behaviors, see paper: section "Application of the system to additional mouse behaviors." and Figure 7 for details.
3. Graphical User Interface
Q. How do I operate the GUI ?
A. Please see the User Guide for detailed step by step instructions on operating both the training and testing systems.
4. The Testing System
Q. What is the output of the system and and how do I interpret it?
A. In the output folder specified by the user, a folder "ClassificationResults" will be created. In this folder five files/folders are created:
(1) fgImages: a directory that contains a set of .png files, for example fg_0013833.png is the foreground of the 13833-th frame of the video. We empirically found the quality of the foreground has the most direct impact on the accuracy of the system prediction. The bad quality could be due to the change of lighting or the occlusion of the mouse by the nesting materials. Visualizing these images is the quickest way to know if you should safely trust the system prediction.
(2) pred.txt: a text file that saves the system prediction. Each row is a numerical value corresponding to the action in each frame (using the default model, value: action is 1: drinking, 2: eating, 4: grooming, 5: hanging, 6: micromovement, 7: rearing, 8: resting, 9:walking). The first four rows are 0,0,0,0, this is because the system predicts a label for every 9 frames, we pad 4 null labels in the beginning so the first valid prediction is for the 5-th frame, which is the center of the first chuck of 9 frames (frame 1 - 9).
(3) save.mat: a mat file that saves the latest state of the system including the video, the output folder, the model, which frame is being computed, the background and the parameters, etc. If the program crashes, you can load this file to go back to the latest state.
(4) tmpc2pos.txt: these are the intermediate outputs of the system. You can ignore it.
(5) tmpppred.txt: these are the intermediate outputs of the system. You can ignore it.
(6) pred.avi: this file is a video showing the annotations overlaid over the video. This is very helpful to see visually what kind of frames are being misclassified.
Q. How long will the system take to run?
A. This really depends on whether or not you are running on a GPU, what GPU you use, and the resolution of your videos. Here are some rough estimates based on testing on videos of size 320x240:
On a CPU:
-
On a NVIDIA GTX 295 GPU:
-
about 7 frames per second. For every 152 frames, computing foreground: 9-10 seconds, computing position features: .1-.2 seconds, computing motion features using cns: 10-11 seconds,classification: .1-.2 seconds.
-
-
On a NVIDIA GTX 480 GPU:
-
about 9 frames per second. For every 152 frames, computing foreground: 12-13 seconds, computing position features: .2-.3 seconds, computing motion features using cns: 3-3.3 seconds, classifying frames: .1-.2 seconds
-
-
On a NVIDIA NVIDIA Tesla C1060 GPU:
-
about 7 frames per second. For every 152 frames, computing foreground: 9-10 seconds, computing position features: .1-.2 seconds, computing motion features using cns: 11-12 seconsd, classifying frames:.1-.2 seconds
-
It will be around .64 frames per second. More specifically, for every 152 frames, computing foreground: 9-10 seconds, computing position features: .1-.2 seconds, computing motion features using cns: 225-230 seconds, classification .1-.2 seconds
-
Q. How do I optimize the speed of the system?
A. Purchase a GPU and install CUDA driver and cns to make the best use of the system. Also, the more of the exterior of the cage you crop out during Step 2 of the User Guide, the faster the system will run. Lastly, during runtime of the system, you can uncheck the option "Display all results" in Step 8 of the User Guide, which will also speed up the system.
5. The Training System
Q. How long will the system take to train?
A. This really depends on how much training data you have, and how easy it is to use the features to train a classifier, and whether or not you are using a GPU. You will get updates at every stage of your progress.
Q. What is the output of the training system and and how do I interpret it?
A. In the output folder specified by the user, a folder "trained_model" will be created. In this folder, there will be a number of files and folders, depending on the training parameters you choose:
-
If you choose to compute patches:
-
Folder c1: this contains files containing the c1 features for all the videos. If you want to compute new patches, you can use the command line (see User Guide) and you will not have to recompute the c1 features. Otherwise, you can either delete this folder or ignore it.
-
File trainC1Maps.mat: This contains the C1 maps randomly selected and used to help with the motion feature reduction. This can be reused if you use the command line, or ignored or deleted if you are happy with your patches.
-
File s2patches.mat: This is the original set of patches selected. There will be many more patches here than post-svm reduction. You can ignore or delete this file after you have computer your selS2Patches (the selected patches).
-
File preC2.mat: These are the C2 features calculated using trainC1Maps and s2patches.mat. You can ignore or delete this file if you are happy with your selected features.
-
File selWeights.mat: these are the weights used in the svm reduction of the features. You can ignore or delete this file.
-
-
If you do not choose to only compute patches you will have the following files:
-
Folder c2: this contains all the c2 features. You can use this folder and the command line to retrain a model with different position features for instance. If you do not plan to do this, you can delete this folder.
-
Folder pos: this contains all the position features. You can use this folder with the command line, ignore it, or delete it.
-
Folder model: this is a very important folder. In it, it contains the file mouse.model, which is your trained classifier! And the file test.tags, which is the predicted annotations of all the videos given the newly trained classifier. The files test.dat and train.dat are not important and can be ignored.
-
File sta.mat: this is an important file, it contains mean and standard deviation of the position features, and are used for normalization.
-
-
You will always have the following files:
-
selS2patches.mat: important file, contains the patches selected. This is needed for testing. Do not delete.
-
save.mat: if you stop the training program, you can use this file to restart it from the point it was stopped it
-
training_params.mat: important file, contains training parameterss (such as C1 parameters) which are needed to do testing later
-
-
If you choose to perform leave one out cross validation
-
Folder leave_one_out_models: in this folder there will be folders named split_*, where * is the video name of the videos to analyze. Each of the split_* folders represents a model trained on all videos except for the video *, and tested on the video *. In each of the split_* folders there will be 4 files: mouse.model is the model trained on all videos except *, test.tags is the annotations for video * using the trained model, test.dat and train.dat are files you do not need to worry about. You can delete them if you want.
-
When the GUI completes running it will show you a confusion matrix showing how well the system performed. If you did not select to do leave one out cross validation, you will get one confusion matrix on the left side of the screen. This confusion matrix represents the results of training on all the data, and then testing on all the data using the trained model. This is not an accurate representation of how well your system will perform! Since you are training and testing on the same data, the results will be better than they will be on new data! We highly recommend performing leave one out cross validation. If you choose to perform leave one out cross validation, you will get two confusion matrices. The one on the left will be the same - train on all data and test on all data. The confusion matrix on the right will give you an option of which of the leave one out confusion matrices you want to look at. When you select a video, it will show you the confusion matrix of the predicted annotations for that video given a classifier that was trained on all videos except for that one. You can also see the results over all the leave one out annotations performed.