Read all of the system documentation before starting to use the system (Overview, System requirements and installation instructions, Limitations of the system, FAQ). It is very important to understand what data to give the system in order to obtain the best results.
Please report any bugs to sbraun [at] mit.edu
Go to: Testing, Training, or Command line .
In this section we describe how to use the system assuming you already have a trained model (either one you have trained yourself, or one published with the system).
Step 1: Choose the "Use an existing model" option on the intro screen and hit the next button.
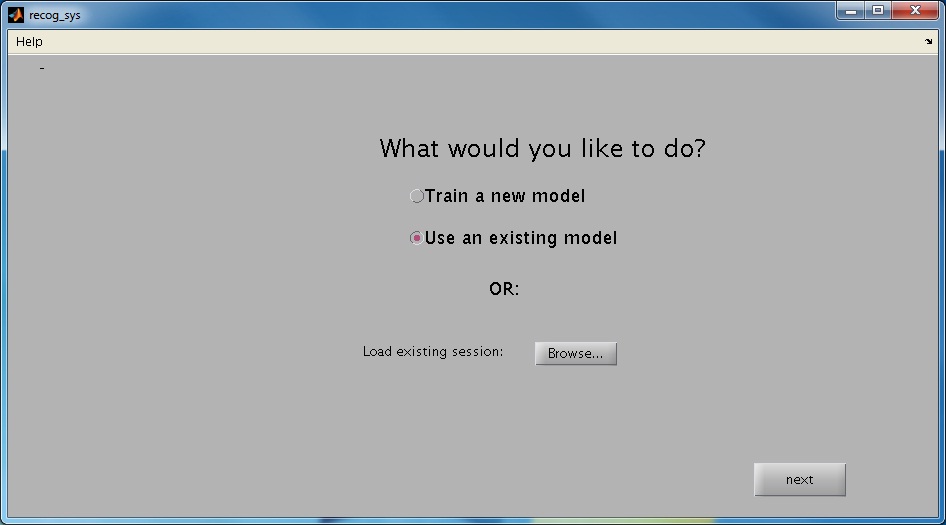
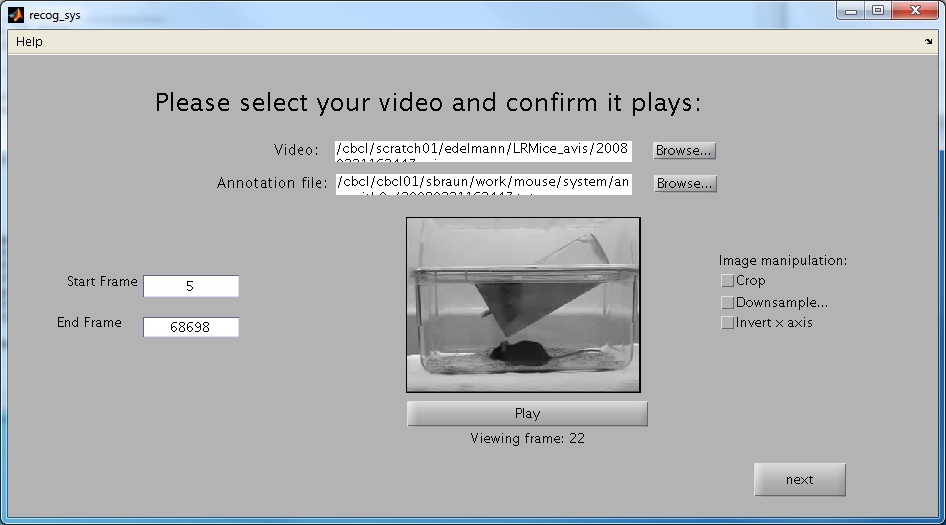
Step 2: Choose a video to load by pressing the browse button and selecting an appropriate video file.

-
Once the video has loaded make sure that you can play the view by pressing the play button.

-
Crop the video if it is much larger than your cage (this will save you processing time later on). To do so select the Crop checkbox. Then select a point in the video box, and click and drag to select the desired cropping rectangle.
-
If the videos the system was trained on are a different resolution from the video being tested you will need to either downsample them or upsample them. The system provides an option to downsample by a factor of 2 in both directions (Using the "Downsample" check box). If a different factor is needed please use an appropriate video processing software to modify your video before continuing. Note that the released system was trained on videos of resolution 320x240.
-
The feeder and water tube in the testing video should be in the same directions as those in the training videos. If this is not the case, please select the "Invert x axis" check box. The published system was trained on videos with the cage and feeder facing the left (as is shown in the image above).
-
Select the start and end frame for the processing. Note that annotations will only be given to frames in this range.
-
Once you are finished processing, select the "Next" button to continue.
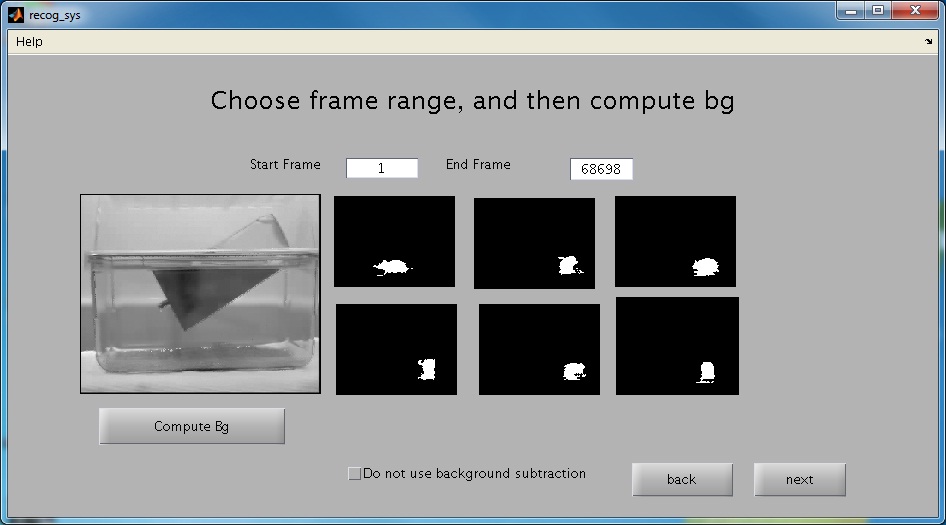
Step 3: Press the "Compute bg" button to compute the background. If your results look like complete nonsense, your video format may not be supported by the machine you are using.
-
In order to obtain good results you should either sample over a large frame range, or sample during a frame range in which the mouse is active. The large image box shows the compute background, and the 6 images on the right show sample foreground images. An example of a compute background and foreground is shown below. If the compute background does not look like the background of your video (i.e. the cage without the mouse), or the foreground samples do not look roughly mouse shaped, consider using a different range for the background computation.
-
If you have trained your own system without using background subtraction, you should select the "Do not use background subtraction" button. The published system does use background subtraction, so it is important not to select this button if you are using the published system.
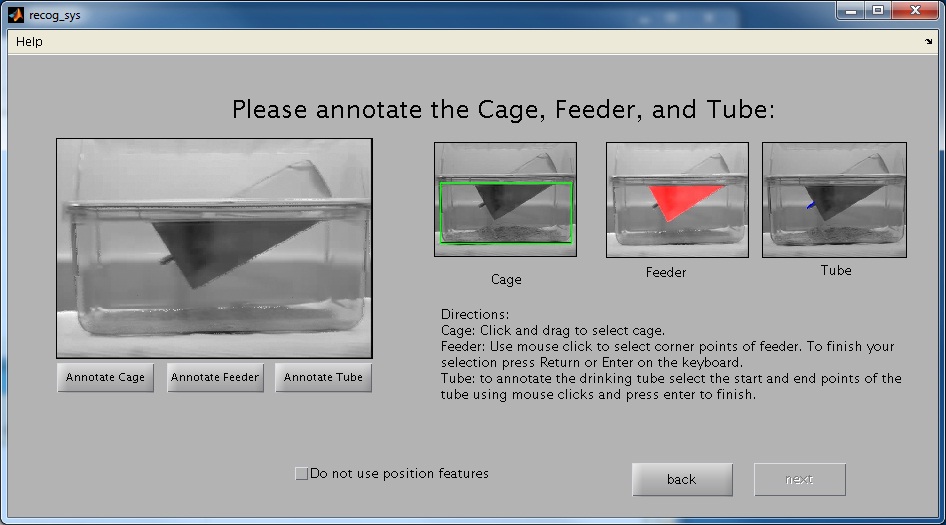
Step 4: Use the three buttons "Annotate Cage", "Annotate Feeder", and "Annotate Tube" to annotate the cage, feeder, and drinking tube as is shown in the example to the right.
-
To annotate the cage simply click and drag using the mouse.
-
To annotate the feeder use mouse click to select corner points of the feeder. To finish your selection press Return or Enter on the keyboard.
-
To annotate the drinking tube select the start and end points of the tube using mouse clicks and press enter to finish.
-
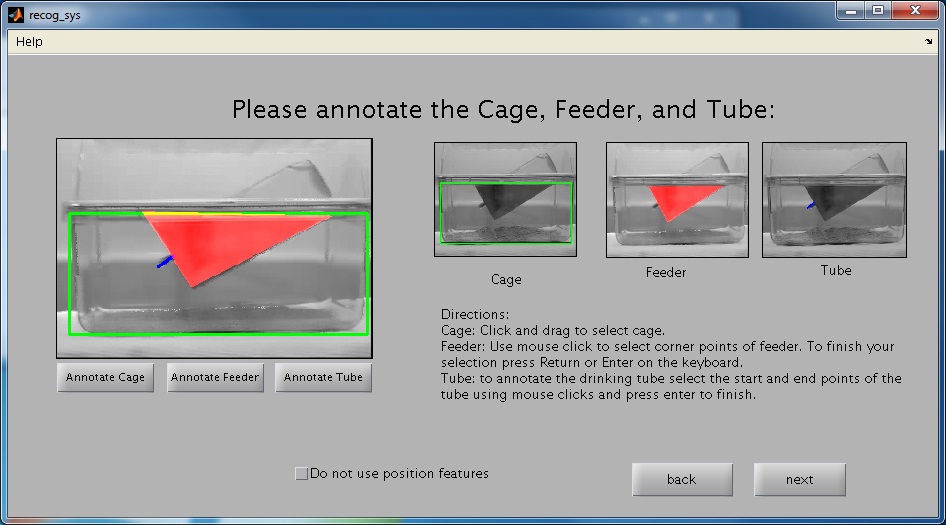
Below is shown an example of a fully annotated image:
-
If you have trained your own system without using position features, you should select the "Do not use position features" button. The published system does use position features, so it is important not to select this button if you are using the published system.
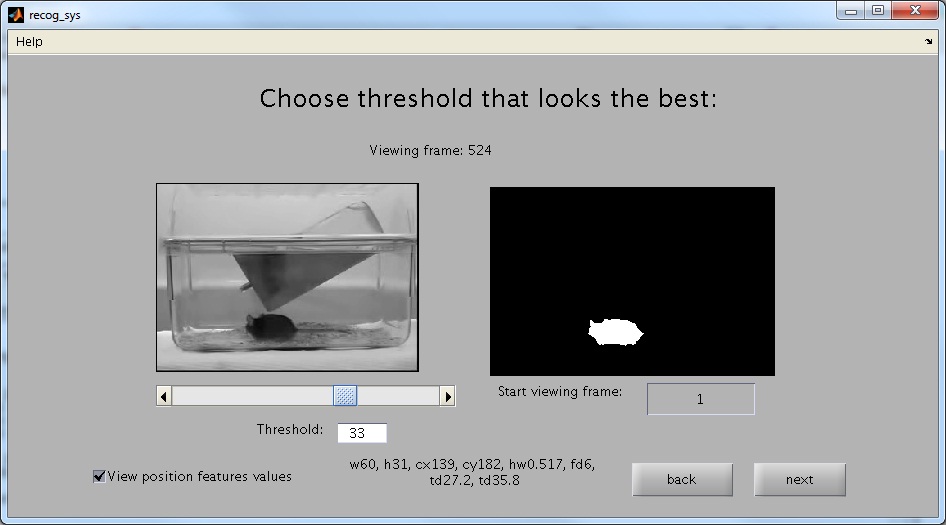
Step 5 Use the slider to select a threshold that looks good (the foreground image shown on the right should give a good estimation of the mouse's location).

-
The foreground will play continuously. You should make sure that the threshold you selected is good for the entire video. To do this, change the "Start viewing frame" number, and observe the foreground in different parts of the video.
-
If you want to see the computed position features of the frame shown you should select the "View position features values" check box. If selected it will display 8 of the position features used: w (the width of the mouse), h (the height of the mouse), cx (the horizontal distance from the left), cy (the vertical distance from the top), fd (the distance to the feeder), and td1 and td2 (the distance to the two ends of the drinking tube). To see a visual representation of these features see Overview.
Step 6 If you have want to change one of the previously selected properties, press the "Edit" button, otherwise, hit "Test a model" to continue.

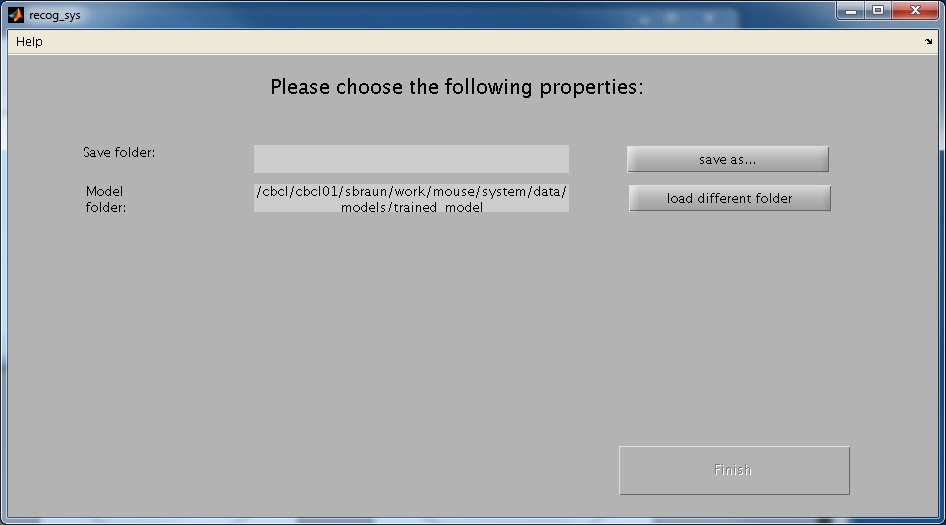
Step 7 Select a save folder and an alternate model, if desired.
-
The results will be saved in a new folder named "ClassificationResults" within the save folder. The save folder you select must not already contain a "ClassificationResults" folder in it. If it does contain one, the system will not let you continue.
-
If you wish to use a model that you have trained, select the folder containing the model. This folder should be called "trained_model", and contain the necessary files produced by the system.
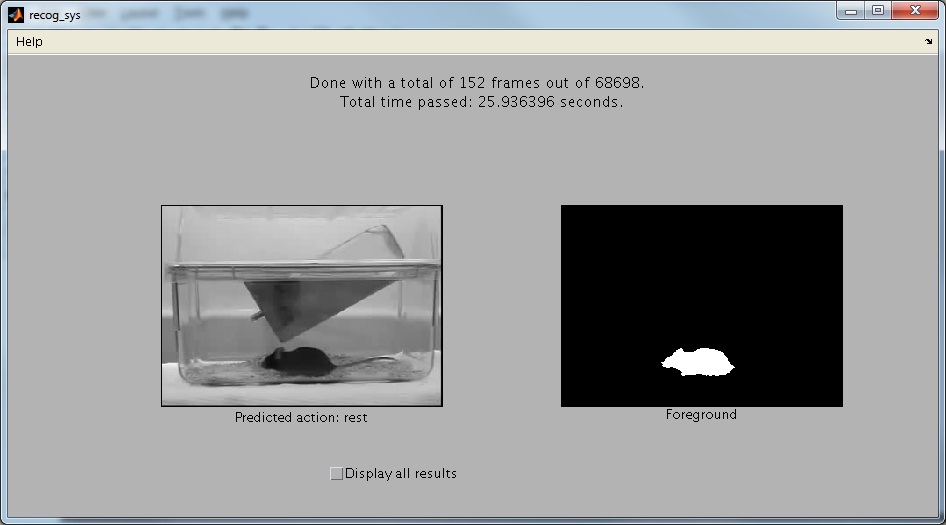
Step 8 Finally, the system will start working. The system will take some time to set up, and will then process frames in chunks. Progress reports will be displayed to tell you how far along the system is.
-
The system processes the video in blocks, and will display one sample image and it's classification per block. To see classification for all frames, select the "Display all results" checkbox. Note that this checkboc might be slow to respond, so be patient with it.
-
When the system is finished, the predictions will be located in the ClassificationResults folder in a text file called pred.txt. The file will contain integers corresponding to the behaviors as follows: 0. not valid. 1. eat. 2. drink. 3. groom. 4. groom. 5. hang. 6. micromovement. 7. rear. 8. rest. 9. walk. The first few frames (around 4) and the last few frames will not be annotated, and will be labeled as 0. other in the annotation file.
-
The system will create a video with the annotations for each frame overlated on it. This video will be in the classification folder and be called pred.avi. This is very useful to figure out visually which frames are the problematic ones.
-
Sample foreground frames are randomly saved into the fgImages folder. These can help confirm that the background subtraction did work correctly for the entire video.
-
If you have to stop the classification in the middle, you can restart it by starting recog_sys, and on the first screen loading the saved file under ClassificationResults/save.mat.
Training System User Guide
Step 1: Choose the "Use an existing model" option on the intro screen and hit the next button.

Step 2: Choose a video to load by pressing the browse button and selecting an appropriate video file. Then choose an annotation file. The annotation file must be a text file, with one numerical annotation per row. The annotations must be integer values, starting at 1, and going up numerically (not skipping any integers). The length of the annotation file must be exactly the same as the number of frames in the video.
-
See Testing, step 2 for more detailed information about how to fill the rest of the fields out.
Step 3: Press the "Compute bg" button to compute the background.
-
See Testing, step 3 for more detailed information about how to fill the rest of the fields out.
Step 4: Use the three buttons "Annotate Cage", "Annotate Feeder", and "Annotate Tube" to annotate the cage, feeder, and drinking tube.
-
See Testing, step 4 for more detailed information about how to fill the rest of the fields out.
Step 5 Use the slider to select a threshold that looks good (the foreground image shown on the right should give a good estimatio
-
See Testing, step 5 for more detailed information about how to fill the rest of the fields out.
Step 6 If you have want to change one of the previously selected properties for the video you selected, press the "Edit" button.
-
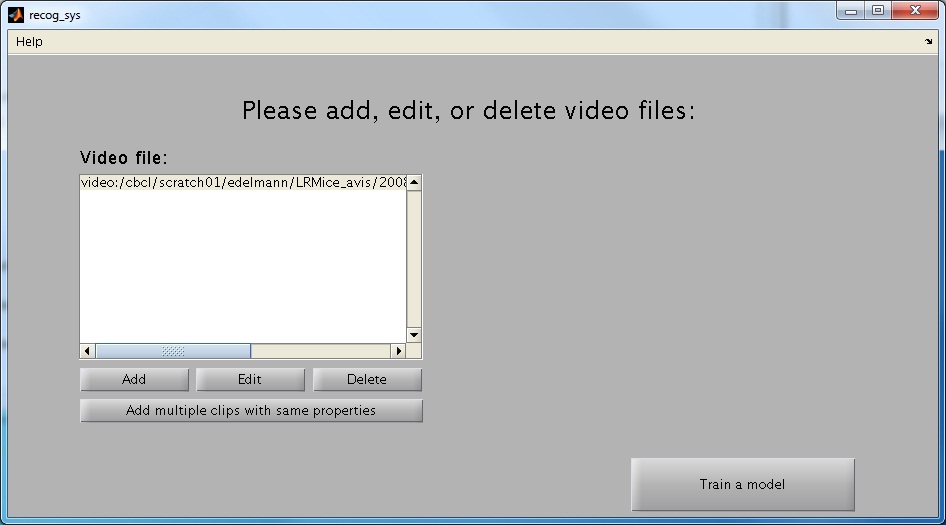
You may add additional training videos using the "Add" button, or delete an added video using the "Delete" button. If you decided to add multiple training videos, for best results make sure that the video resolution is the same for all videos.
-
If you want to add multiple videos with the same background, cage, and foreground threshold press the "Add multiple clips with same properties". You will be prompted to enter a folder that contains the video clips. Note that the folder must only contain the clips which you want to use. You will then be prompted to enter a folder that has the annotation files. The annotation files must have the exact same name as the video clips (except for the extension), and be text files containing one annotation for each frame in the clip. The training system will add all the video clips to the training system. If you want to edit any of them, you can simply press the "Edit" button.
-
When you are done adding and editing videos press the "Train a model" button.
Step 7 Select a save folder. The model and other files will be saved in a folder named "trained_model" inside of this save folder.

-
Change the action names if desired. The action names must be a comma separated list of names. For instance, we would change our action list to "not valid, eat, drink, groom, groom, hang, micro, rear, rest, walk". This action list will be used to display the results visually in future testing, so it is useful for you to enter good descriptors of your actions.
-
If you have already computed patches and want to use them select them by using the browse... button. Note that these patches will be in the "trained_model" folder in a file called "selS2patches.mat".
-
If you only want to compute s2 patches, and not train an entire model using the clips selected you should check off the "Only computed patches" check box.
-
The current system uses 14 position features. If you only want to use some of them (for instance if your cage does not have a feeder, you may not want to use the feeder position features), deselect the ones that you do not want to use.
-
If you want to perform leave one out cross validation on the videos select the "Leave one out cross validation by video" checkbox. If you select this checkbox, the training system will first train on all the videos (this will be your model). After this, the system will train on n-1 videos (assuming you have a total of n videos) at a time, and show you the result on testing on teh last video. This is really helpful in evaluating how well your system performs.
-
If you want to change any of the training options, select the "Training Options" button. This will bring up the parameters shown below:

-
The following describes how to change the parameters. See Technical report: Section SUPPLEMENTARY METHODS/System Overview (page 21).
-
Pool size: The C1 Layer will pool over square windows of this size.
-
Pool step size: This will be the overlap between the windows being pooled over.
-
Patch sizes: The system will use random patches of these sizes as the dictionary.
-
Number of patches per size: The number of patches of each size to be used (this will later be reduced using an SVM)
-
Number of training frames: This is the total number of training frames used to calculate maps to be used to reduce the number of patches.
-
Directions: These are the orientations that the filter will operate over.
-
Speed: The speed of the filter.
-
S Size: This is the spatial size of the filter used.
-
T Size: This is the temporal size of the filter used. You should change this depending on the fps of the recorded video, and how long the mouse's actions last.
-
Threshold:
-
nf1 constant: This is a normalization constant for the S1 layer
-
-
When you are done modifying your parameters press the "Finish" button.
Step 8 Patiently wait for the system to train. You will get progress reports about what stage of training you are on.
Command Line User Guide
Training System
In order to train the system using the comman line in matlab you must create a mouseTrainingSystem object. The file source/mouseTrainingSystem.m contains detailed information about the parameters you need to initialize the mouseTrainingSystem with. The mouseTrainingSystem must be run from the root directory of the package (the folder containing recog_sys.m). The parameter list has been repeated below for convenience:
-
Usage: mouseTrainingSystem(videoFn, annFn, saveDir, bgIm, cage, opts)
-
Parameters:
-
videoFn - a list of absolute paths to the video, videoFn{i} represents the path to the ith video
-
annFn - a list of absolute paths to annotation file (in text format), annFn{i} is the path to the ith annotation file
-
saveDir - absolute path to the directory to save the model (and other training parameters)
-
bgIm - a list of background images, bgIm{i} is the background image corresponding to videoFn{i}
-
cage - structure describing the positions of the cage
-
calib.dx/dy - difference between cage left/top and standard cage left/top, cage.calib{k} described difference for kth video
-
calib.dw/dh - difference between cage width/height and standard cage width/height, cage.calib{k} described difference for kth video
-
fpos.x/y - array of x/y points describing the feeder outline, cage.fpos{k} described feeder outline for kth video
-
Tube.Near.x/y /Tube.Far.x/y - the tube parameters, cage.Tube{k} described tube parameters for kth video
-
-
opts - a structure with parameters for customizing the configuration (not optional)
-
fgMask - the list of foreground mask image, fgMask{i} corresponds to the mask for video i
-
fgThres - the list of foreground threshold values
-
imgFunc - the list of image processing functions to apply to each frame (i.e. resize/scale/invert)
-
startFrame - the list of frames to start the processing
-
endFrame - the list of frames to end the processing
-
labels - a list of integers representing the actions, e.g. [1,2,3,4]
-
saction - comma separated list of action names, e.g. 'eat, groom, walk'
-
onlyComputePatches - 1 iff we want to only compute selected s2 patches, 0 otherwise
-
noUseBg - 1 if no background subtraction should be used, 0 otherwise.
-
noPositionFeatures - 1 if no position features should be used, 0 otherwise
-
training_opts - a structure containing training parameters
-
C1PAR
-
PoolSiz - pool over [PoolSiz PoolSiz] s1 units
-
PoolStepSiz - downsample every PoolStepSiz units
-
-
S1PAR
-
Ssiz - [Ssiz Ssiz] spatial size
-
Tsiz - temporal depth of the filter
-
dirs - the orientations
-
speed - speed of filter
-
nf1const - normalization constant for S1 layer
-
thre - the threshold
-
-
patchParams
-
numPatchesPerSize - number of patches to use for each size
-
patchSizes - the patch sizes to use in training, e.g. [4 8 12]
-
numTrainFrames - number of c1 maps to use in training
-
-
-
selectedPatchLocation - OPTIONAL argument: if used will load/save selected patched from/to this location
-
whichPositions - OPTIONAL argument: array of desired position features, i.e. [1 2 3 4 6 7 8 9], defaults to [1:14]
-
-
-
Running the system:
-
To process the video and train the system you need to call a series of function on the mouseTrainingSytem you create. Below is the list of functions you need to call depending on whether or not you need to compute patches, both scenarios assume your mouseTrainingSystem object is called myMouseSystem:
-
Compute patches and train:
-
myMouseSystem.save_c1();
-
myMouseSystem.extractRandC1Patches();
-
myMouseSystem.extractRandC1Maps();
-
myMouseSystem.computeTrainC2();
-
myMouseSystem.patchSelection();
-
myMouseSystem.save_c2_and_pos_files();
-
myMouseSystem.computeSta();
-
myMouseSystem.trainClassifier();
-
To train a classifier using leave one out method (train on all but a certain video, say the ith video) do the following:
-
myMouseSystem.trainLOO_setup(i);
-
myMouseSystem.trainLOO();
-
-
-
Train using preexisting patches:
-
myMouseSystem.save_c2_and_pos_files();
-
myMouseSystem.computeSta();
-
myMouseSystem.trainClassifier();
-
To train a classifier using leave one out method (train on all but a certain video, say the ith video) do the following:
-
myMouseSystem.trainLOO_setup(i);
-
myMouseSystem.trainLOO();
-
-
-
-
The system will save the results in saveDir. More specifically, the model trained on all the examples will be saved in saveDir/model/mouse.model. The selected patches will be saved in /model/selS2patches.mat. The position means and standard deviations will be in saveDir/sta.mat. The training parameters will be in saveDir/training_params.mat. The leave one out models will be in saveDir/leave_one_out_models/split_*, where * depends on which video the leave one out was performed on. In these folders there will be a trained model. mouse.model, and a text fiel containing the annotations on the left out video, test.tags.
-
Hints:
-
To see an example of an initialization of all the input parameters to mouseTrainingSystem, use the gui to make a mouseTrainingSystem (pause the Matlab gui in source/gui/handlesToTrainingSystem).
-
You can use source/tracking/computefgmask to compute a foreground mask that excludes the feeder and areas outside of the cage
-
You can use source/tracking/computebg to compute a background to feed into the system
-
You can look at the code in recog_sys.m methods AnnotateCage_Callback, AnnotateFeeder_Callback, AnnotateTube_Callback to see how the cage parameters are calculated.
Testing System
In order to test the system using the command line in matlab you must create a mouseSystem object. The file source/mouseSystem.m contains detailed information about the parameters you need to initialize the mouseSystem with. The mouseSystem must be run from the root directory of the package (the folder containing recog_sys.m). The parameter list has been repeated below for convenience:
-
Usage: mouseSystem(videoFn, saveDir, bgIm, cage, opts)
-
Parameters:
-
videoFn - absolute path to the video
-
saveDir - absolute path to the directory to save the prediction
-
bgIm - the background image (image processing functions already applied)
-
cage - structure describing the positions of the cage (note that x is distance from the left side of the cage, and y is distance from the top of the cage)
-
calib.dx/dy - difference between cage left/top and standard cage left/top (e.g. cage left - std cage left)
-
calib.dw/dh - difference between cage width/height and standard cage width/height (e.g. std cage width / cage width)
-
fpos.x/y - array of x/y points describing the feeder outline
-
Tube.Near.x/y / Tube.Far.x/y / Tube.Length - the tube parameters, not that Tube.Near must be closer to where the mouse drinks than Tube.Far
-
-
opts - a structure with optional parameters for customizing the configuration
-
nLabelsProcesed - the number of labels already processed. starts processing at the appropriate frame. Defaults to 0.
-
modelFn - the path to an alternative model. Defaults to /models/default
-
fgMask - the foreground mask image. Defaults to all ones (i.e. no mask)
-
fgThres - the foregorund threshold value. Defaults to 10.
-
imgFunc - the image processing function to apply to each frame (i.e. resize/scale/invert). Defaults to identity function (i.e. no transformation).
-
startFrame - the frame to start the processing. Defaults to 1.
-
endFrame - the frame to end the processing. Defaults to length of video.
-
noPositionFeatures - 1 if no position features should be used, 0 otherwise. Defaults to 0.
-
-
-
Running the system:
-
To process the video and obtain annotations use one of two functions. You can either process the entire video at once, using processEntireVideo, or you can process it in chunks using processVideoChunk. In both cases the annotations will be saved in saveDir/pred.txt, randomly selected foreground frames will be saved in saveDir/fgImages/ (so you can make sure that the background subtraction worked well over the entire video) and a video of the annotations overlayed on the original video will be saved in saveDir/pred.avi.
-
Hints:
-
To see an example of an initialization of all the input parameters to mouseSystem, use the gui to make a mouseSystem (pause the Matlab gui in source/gui/handlesToSystem). This will show you the exact format of all inputs.
-
You can use source/tracking/computefgmask to compute a foreground mask that excludes the feeder and areas outside of the cage
-
You can use source/tracking/computebg to compute a background to feed into the system
-
You can look at the code in recog_sys.m methods AnnotateCage_Callback, AnnotateFeeder_Callback, AnnotateTube_Callback to see how the cage parameters are calculated.